Creating a Morse encoder with Arduino
A few days ago, I received my SparkFun inventor’s kit. This kit includes an Arduino and many electronic components such as LCD panel or drive motor. And, icing on the cake, it also provides several tutorials to brush up on electronics. In short, a perfect starter kit.
The first tutorial is about switching on and off a LED. Not really challenging (especially with the 4 lines provided source code). So, let’s raise the bar higher: we will create a Morse language encoder. The Morse language maps each letter and number to a unique sequence of dot and dashes (respectively a short and long light flash). So, making the LED blinking, we would be able to transmit a message. Sounds more exciting, isn’t it?
Configuring SublimeText for Arduino development
First of all, either you use it or not, you have to download the Arduino IDE. I tried to use it for a hour, and honestly, it sucks: no code autocompletion, strange indentation, too small debug output, etc. So, finally, I decided to find an alternative.
I am using Sublime Text for a while now, and I looked naturally for an Arduino plug-in. And, thanks to Robot-Will, I found such a plug-in: Stino. To grab it, simply use the package manager, looking for “Arduino-like IDE”.
The configuration is not really straightforward. In order to compile and send your program correctly to your Arduino, you will have to configurate several parameters:
- Arduino > Preferences > Select Arduino application folder: the folder where
arduinobin is, - Arduino > Preferences > Change Sketchbook folder: location of all your Arduino programs,
- Arduino AVR boards: select your board model (“Arduino UNO” in the case of the SparkFun’s kit)
- Serial port: choose the corresponding port on which your Arduino is plugged (
/dev/ttyUSB1in my case)
Selecting folders is pretty unergonomic. After selecting the menu item, a text field appear. Just press / (in Linux at least) and validate to see the folder hierarchy. Then, navigate with arrows to choose the appropriate input.
To access serial port devices, you should launch Sublime Text as root. I do not like this unnecessary elevation of privileges for a text editor: does anyone have a workaround?
Creating a basic LED circuit
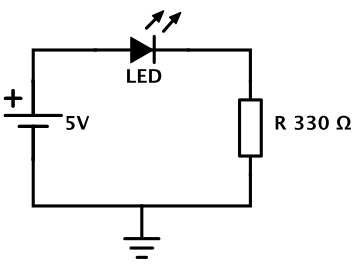
Now we got a user-friendly Arduino editor, let’s wire our board. You will need a LED, a 330Ω resistor, and the 5V power source from your Arduino. Here is the corresponding blueprint:

No need of soldering iron as we have a breadboard. The breadboard is the board containing a lot of connection points. The board is split into two parts (electrically independent) by a middle line. Two vertical lines provides the energy source (+) and the ground (-). All the components legs plugged on the same horizontal line would be wired together. Knowing that, let’s plug our components:
- Power line on the “Power 5V” Arduino pin
- Ground line on the “Power GND” Arduino pin
- LED: longest leg (the
+leg) on C2 and shortest on C3, - Resistor: A3 + Ground,
- Wire between Arduino pin 13 and E2
As a LED is a polarized component: you should plug it in the right direction. At these voltage, it should not break anything. Yet, if you plug it wrongly, it would simply works as an opened switch.
Once our circuit built, let’s try it with this really simple program:
void setup()
{
    pinMode(13, OUTPUT);
}

void loop()
{
    digitalWrite(13, HIGH);
    delay(1000);
    digitalWrite(13, LOW);
    delay(1000);
}
All Arduino programs should contain both the setup and loop functions. The first one initializes all our components. In this case, we tell Arduino the pin 13 will be used only as an output, and no input would be made on it.
Then, the loop function will be executed forever (unless Arduino is stopped manually). In this case, we send a HIGH signal (meaning +5V) on the pin 13, which light on the LED. We wait 1 second, then we send a LOW signal (0V) to switch it off, and we wait again.
Now, verify/compile your code and upload it (CTRL + ALT + U). If your circuit is wired correctly, the LED should slowly blink.
Developing a Morse encoder
Emitting a “SOS” signal
Now that our circuit is done, let’s start by emitting one of the most famous Morse message: “SOS”. The equivalent of S and O in Morse language are respectively ... and ---.
We are going to use the following conventions for our project (which are the recommended standards):
- Dot duration is 1 time unit,
- Dash duration is 3 time units,
- Each letter would be separated by 3 time units,
- Each word would be separated by 7 times units.
So, we are now able to write some very simple functions:
#define TIME_UNIT 200

void dot()
{
	digitalWrite(13, HIGH);
	delay(TIME_UNIT);
	digitalWrite(13, LOW);
	delay(TIME_UNIT);
}

void dash()
{
	digitalWrite(13, HIGH);
	delay(3 * TIME_UNIT);
	digitalWrite(13, LOW);
	delay(TIME_UNIT);
}

void endLetter()
{
	delay(3 * TIME_UNIT);
}

void space()
{
	delay(7 * TIME_UNIT);
}
We first define the TIME_UNIT constant as a #DEFINE directive. It means all occurences of TIME_UNIT will be automatically replaced during compilation phase, saving some memory. Remember we are on an low memory device: memory is precious.
Then, we apply our conventions creating a bunch of functions. Emitting a SOS signal is now done through:
void loop()
{
	dot(); dot(); dot(); endLetter();
	dash(); dash(); dash(); endLetter();
	dot(); dot(); dot(); endLetter();
	space();
}
Upload your program, and you should see your distress beacon.
Creating a library
As our code for Morse specific usage starts to grow, it is a good idea to move it into a separate library. We proceed as if we were doing some C: creating a header file and the library itself. The header file MorseTranslator.h contains only our function prototypes and class scoped variables:
#ifndef MORSE_TRANSLATOR_H
#define MORSE_TRANSLATOR_H

#include "Arduino.h"

class MorseTranslator
{
	public:
		MorseTranslator(byte pin, unsigned int timeUnit);
		void dot();
		void dash();
		void endLetter();
		void space();

	private:
		byte _pin;
		unsigned int _timeUnit;
};

#endif
Do not forget to embed the Arduino.h, as the Arduino library is not automatically imported in libraries.
As you may have noticed, the constructor of our library now takes the pin on which we want to send data, and the duration of our flash light (which is now an attribute of our class, for more flexibility). We split all our data between public and private keywords, according to their accessibility.
We used the type byte to define the output pin. In all the Arduino examples, pins are int, yet it consumes too much memory. An integer is indeed coded on two bytes (allowing values up to 32,767), whereas a byte (synonym of unsigned char) is coded on a single byte, allowing values up to 256, which is enough for our pins.
Finally, we just have to move all fonctions into the MorseTranslator.ino file, prefixing all our method by our class name:
MorseTranslator::MorseTranslator(byte pin, unsigned int timeUnit)
{
	pinMode(pin, OUTPUT);
	_pin = pin;
	_timeUnit = timeUnit;
}

void MorseTranslator::dot()
{
    digitalWrite(_pin, HIGH);
    delay(_timeUnit);
    digitalWrite(_pin, LOW);
    delay(_timeUnit);
}

// ...
Now, your main file should look like:
#include "MorseTranslator.h"

MorseTranslator morseTranslator(13, 200);

void setup()
{
}

void loop()
{
    morseTranslator.dot(); morseTranslator.dot(); morseTranslator.dot();
    morseTranslator.endLetter();

    morseTranslator.dash(); morseTranslator.dash(); morseTranslator.dash();
    morseTranslator.endLetter();

    morseTranslator.dot(); morseTranslator.dot(); morseTranslator.dot();
    morseTranslator.endLetter();

    morseTranslator.space();
}
Upload again your program to ensure nothing broke during this refactoring.
Using a Morse dictionnary
Next evolution is to use a dictionnary to map each letter to its Morse signal. As there is no native hash maps in Arduino world, we are going to use a structure, which is simply a new type definition containing several variables of different types.
struct dictionnaryEntry {
	char character;
	String signal;
};

dictionnaryEntry dictionnary[36] = {
	{ 'a', ".-" },
  	{ 'b', "-..." },
  	// ...
  	{ '0', "-----" }
};
We define here a new data type dictionnaryEntry, composed of the input character and its Morse correspondance, stored in a String. Then, we define our dictionnary, containing all the translations. For content clarity, I did not include all the equivalences, but you can find it everywhere (for instance, on the Wikipedia Morse page).
Now, let’s create a private function to get a signal from a given char (do not forget to update your header file):
String MorseTranslator::getSignalForChar(char c)
{
  	byte i;
  	for (i = 0 ; i < 36 ; i++) {
		if (dictionnary[i].character == c) {
      		return dictionnary[i].signal;
    	}
  	}

  	// If no matching character, consider it is a space.
  	return " ";
}
Finally, let’s create an emit public function:
void MorseTranslator::emit(char c)
{
	String signal = getSignalForChar(c);

	byte i;
	char signalLength = signal.length();
	for (i = 0 ; i < signalLength ; i++) {
		switch (signal.charAt(i)) {
			case '.':
				dot();
				break;

			case '-':
				dash();
				break;

			case ' ':
				space();
				return;
		}
	}

	endLetter();
}
We are now able to change our loop function to use our newly created emit method:
void loop()
{
	morseTranslator.emit('s');
	morseTranslator.emit('o');
	morseTranslator.emit('s');
}
Of course, you can now change dot, dash and other former used functions accessibility to private, as we are just using emit now.
Upload again, and check that our beacon is still alive.
Transmit user input to Arduino through Serial port
To communicate with our Arduino, we are going to use the Serial link. If you click on the Arduino > Serial monitor > Start menu, a new tab opens, allowing you to send some data to the Arduino. We are going to use this feature to communicate with our LED.
First of all, we have to enable the Serial communication in the setup function, specifying the transmission rate in bauds. In our case, 9600 bauds would be far enough. Just ensure the speed of transmission is the same on both sides, to prevent from strange issues.
void setup()
{
	Serial.begin(9600);
	Serial.println("Serial link established!");
}
Then, check if some data are available on the Serial link, and if so, read it and emit the corresponding signal:
void loop()
{
	// If no serial link is available, do not go further.
	if (Serial.available() == -1) {
		return;
	}

	char c;
	while ((c = Serial.read()) > 0) {
		Serial.print(c);
		morseTranslator.emit(c);
  	}
}
The whole code is available on GitHub, and here is finally the video demonstration of our Morse encoder:
