Learning Jest Through Practice

Jest, best testing framework for React?
Jest is a Javascript testing framework published by Facebook. When browsing the official website’s homepage, three points are highlighted in particular: no configuration, improved performance and easy mocking. Are they marketing promises or reality? To answer this question, we will test Jest on a basic React project and explore its various possibilities.
Yes-No Application
Let’s consider a very simple application whose mock-up is the following:
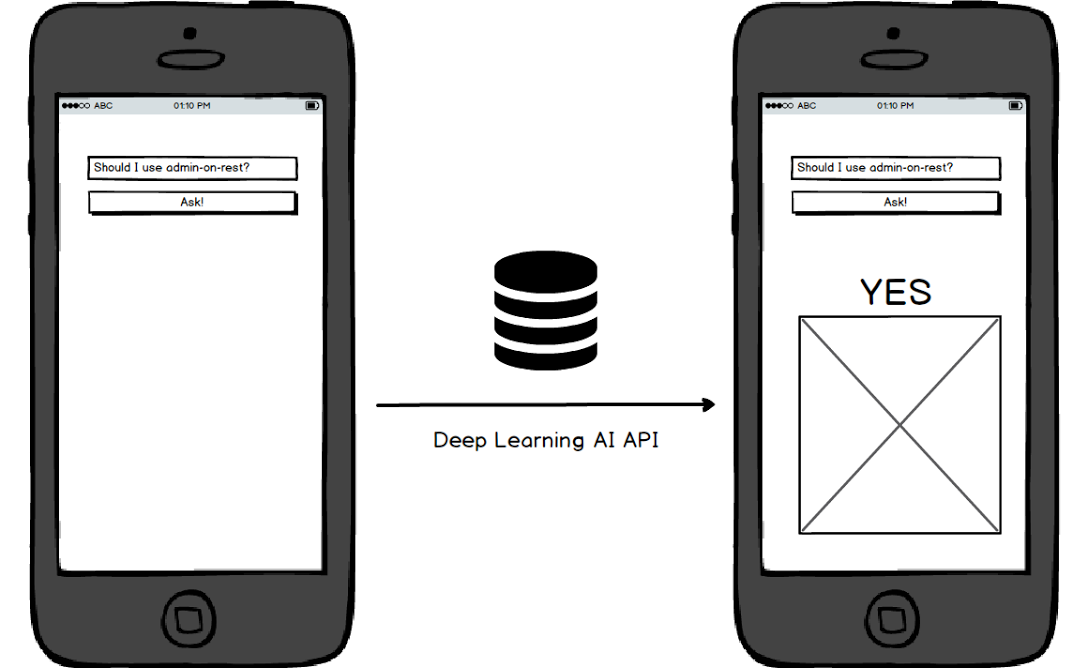
This application consists of a text input and a button. When the user clicks on the button, we display an answer (“yes” or “no”) with an illustration image. Quite simple, but perimeter would be enough to test main Jest features.
The answer comes from a sophisticated deep learning random API: https://yesno.wtf/api/. It returns either a yes or no answer as a JSON response:
{
    answer: "no",
    forced: false,
    image: "https://yesno.wtf/assets/no/14-cb78bf7104f848794808d61b9cd83eba.gif"
}
As a side-note, it doesn’t always set yes or no as explained on the website:
To make things more exciting, we return
{"answer": "maybe"}every 10.000 times.
We can also pass a force parameter to set an expected response. Yet, let postpone the implementation of this parameter in a future version of our YesNo application.
Using Create React App
We are going to use create-react-app in this post. create-react-app is a tool bootstrapping a pre-configured ready-to-use React project. For instance, it handles Hot Module Reload (HMR) allowing us to selectively reload a component we just changed instead of reloading the whole page.
# install create-react-app globally
yarn add -g create-react-app

# bootstrap React application in `yesno` folder
create-react-app yesno
This command creates several files and folder. The most interesting are in the src folder:
src/
  ├── App.css
  ├── App.js
  ├── App.test.js
  ├── index.css
  ├── index.js
  ├── logo.svg
  └── registerServiceWorker.js
The main file of our application is the App.js file. It contains a single render method displaying our page. It is the file we are going to change in this tutorial.
To launch our application, we just need to execute:
yarn startIt should then open a browser tab on http://localhost:3000 with our current application:
Note: if you are using some versioning control, do not forget to initialize it at this step. Even if this tool does a big amount of things by itself, it doesn’t know the project should be versioned.
Installing Jest
Jest is already installed with create-react-app. However, if we use a React project created from scratch, we would need to install it manually using the following command:
# only for React app created from scratch
yarn add -D jest babel-jest
We installed an extra package in the previous command: babel-jest. Thanks to this package, Jest will use our .babelrc file to better understand JSX and ES6. We install these two dependencies as development (-D) dependencies, as they are used only for testing purposes.
By default, Jest looks for all files suffixed by .spec.js or .test.js. In current project, we have a .test.js suffixed file. So, no need for extra configuration. Note that Jest also takes into account all files found in __tests__ folders.
To execute our tests, we may use:
./node_modules/.bin/jestHowever, with a create-react-app application, we don’t have any .babelrc file at root level. Hence, we need to use the react-script wrapper to launch Jest correctly. Fortunately, create-react-app already uses this wrapper through the following command:
yarn testWhich produces the following output:
react-scripts test --env=jsdom

 PASS  src/App.test.js
  ✓ renders without crashing (24ms)
Test Suites: 1 passed, 1 total
Tests:       1 passed, 1 total
Snapshots:   0 total
Time:        1.285s
We may achieve the same result using Jest binary directly in a React app created from scratch.
So our Jest is correctly installed and configured. Despite a very long paragraph, there is no configuration to write in order to make Jest working. One of its promises is resolved kept!
Let’s Test-Driven Develop our App!
What is TDD?
We are now going to work on our application using Test-Driven Development (TDD). This process ensures we do not forget to test any feature, and that we are testing them right. It consists of a four steps process:
- Write a test to demonstrate how an incoming feature should work,
- Launch it and see it fail,
- Write the feature,
- Launch the test and see it pass.
Then, we rinse and repeat once our whole feature is finally done. Step 2 is really important. It is not rare indeed to write a test which always passes. Main example is writing an asynchronous test and to exit before waiting for the end of it. Don’t worry, we’ll see an example later in this post.
Writing Good Assertions
Based on our above mock-up, we basically need four things on our page: an input with a submit button for the question part and a text with a picture for the answer one. Let’s write some assertions we need to prove our mock-up is correctly implemented. Here is our updated App.test.js file:
it('should display a text input to fill question');
it('should display a submit button to send question to the Internet Gods');
it('should display Internet Gods answer in both text and picture format');
At this point, we just translated our product owner wishes (materialized as a backlog story) into automated test assertions.
A special care has to be brought in this part. Writing such assertions has several advantages. The most important one is the share of currently implemented business rules. When an agile project grows, it is not rare we have to implement some business rules contradicting some previous one. Having a clear understanding of why a test fails after a new feature implementation is fundamental to make a good decision about this conflict.
That’s why I strongly encourage to write some functional assertions (should display Internet Gods answer in text format) instead of technical one (should display API answer in a title tag). This way, we may share the test output directly with our product owner (even the non-technical one), and they would be able to understand it without further explanations.
Writing our First Tests
So, let’s start by writing our first tests content:
import React from 'react';
import { shallow } from 'enzyme';

import App from './App';

it('should display a text input to fill question', () => {
    const wrapper = shallow(<App />);
    expect(wrapper.find('input[type="text"]').length).toBe(1);
});

it('should display a submit button to send question to the Internet Gods', () => {
    const wrapper = shallow(<App />);
    expect(wrapper.find('button[type="submit"]').length).toBe(1);
});
We included enzyme library. This package is a set of utilities making React component testing easy as a breeze. The shallow method compiles our React component, but not its children. Hence, if our <App /> component contained a <CustomForm /> component, the <CustomForm /> component would not be compiled and would appear pristine in our output. This way, shallow ensures we are testing our component unitary.
Rest of the test is self-explained. Note we don’t have to include expect import: it is already done in jest, as it function.
Installing Enzyme on a React 16 project
As we required enzyme, we need to grab it as a dependency:
yarn add -D enzymeHowever, when launching our test suite, we encounter the following error:
Enzyme Internal Error: Enzyme expects an adapter to be configured, but found none. To configure an adapter, you should call
Enzyme.configure({ adapter: new Adapter() })before using any of Enzyme’s top-level APIs, whereAdapteris the adapter corresponding to the library currently being tested. For example:
In order to make it work, we need another extra package:
yarn add -D enzyme-adapter-react-16Then, we need to tell Enzyme to use this freshly installed adapter. So, let’s create a src/setupTests.js file:
import { configure } from 'enzyme';
import Adapter from 'enzyme-adapter-react-16';

configure({ adapter: new Adapter() });
If we used create-react-app to bootstrap our application, Jest would automatically use src/setupTests.js file. So, we don’t have anything more to do.
If we don’t use create-react-app, we need to tell Jest where to find its setup files. It is done editing package.json file as following:
{
    "jest": {
        "setupFiles": [
            "./src/setupTests.js"
        ]
    }
}
Now, running our Jest test suite should show us that our two tests are failing (output truncated to remove less important parts).
 FAIL  src/App.test.js
  ● should display a text input to fill question

    Expected value to be (using ===):
      1
    Received:
      0

  ● should display a submit button to send question to the Internet Gods

    Expected value to be (using ===):
      1
    Received:
      0

  ✕ should display a text input to fill question (5ms)
  ✕ should display a submit button to send question to the Internet Gods (3ms)
  ○ skipped 1 test
So, let’s make them pass!
Prototyping our Application
Here is the code to make our tests pass:
import React, { Component } from 'react';

import './App.css';

class App extends Component {
    render() {
        return (
            <div className="App">
                <div className="question">
                    <input type="text" />
                    <button type="submit">Ask to the Gods of the Internet!</button>
                </div>
            </div>
        );
    }
}

export default App;
Our test suite now looks promising:
 PASS  src/App.test.js
  ✓ should display a text input to fill question (18ms)
  ✓ should display a submit button to send question to the Internet Gods (6ms)
  ○ skipped 1 test
Fine! Yet, we still need to handle response display. So, let’s complete our tests like the following:
it('should display Internet Gods answer in both text and picture format', () => {
    const wrapper = shallow(<App />);
    wrapper.setState({
        answer: {
            answer: 'no',
            forced: false,
            image: 'https://yesno.wtf/assets/no/0-b6d3e555af2c09094def76cf2fbddf46.gif',
        },
    });

    const answer = wrapper.find('.answer');
    expect(answer.find('h1').text()).toBe('no');
    expect(answer.find('img').prop('src')).toBe('https://yesno.wtf/assets/no/0-b6d3e555af2c09094def76cf2fbddf46.gif');
});
Let’s make it pass implementing answer display within our <App /> component:
class App extends Component {
    constructor(props) {
        super(props);
        this.state = {
            answer: null,
        };
    }

    render() {
        return (
            <div className="App">
                <div className="question">
                    <input type="text" />
                    <button type="submit">Ask to the Gods of the Internet!</button>
                </div>

                <div className="answer">
                    <h1>{this.state.answer.answer}</h1>
                    <img src={this.state.answer.image} />
                </div>
            </div>
        );
    }
}
Even without launching our web browser, we can notice something is wrong in tests:
  ● should display Internet Gods answer in both text and picture format

    TypeError: Cannot read property 'answer' of null
And indeed: by default, our state is not populated. Hence, JavaScript complains of displaying answer property of a null state property. Our test suite misses a special case: when there is no answer. When we notice such an edge case, we should add a test to ensure it is correctly handled. So, let’s update our test file:
it('should not display any answer by default', () => {
    const wrapper = shallow(<App />);
    expect(wrapper.find('.answer').length).toBe(0);
});
To make it pass and fix all other tests errors, let’s wrap our answer div into the suitable condition:
{this.state.answer && (
    <div className="answer">
        <h1>{this.state.answer.answer}</h1>
        <img src={this.state.answer.image} />
    </div>
)}
Then, we can proudly watch our console and read:
 PASS  src/App.test.js
  ✓ should display a text input to fill question (6ms)
  ✓ should display a submit button to send question to the Internet Gods (3ms)
  ✓ should not display any answer by default (1ms)
  ✓ should display Internet Gods answer in both text and picture format (5ms)

Test Suites: 1 passed, 1 total
Tests:       4 passed, 4 total
Snapshots:   0 total
Time:        0.515s, estimated 1s
Ran all test suites related to changed files.
So, our component is correctly mocked now. We can take a look on our browser, setting an hard-written answer directly in the constructor. Adding some CSS may give you the following output:
Mocking with Jest
It is time now to make some real calls to YesNo API. As usual, let’s start by writing some assertions:
// src/Api.test.js
describe('API Caller', () => {
    it('should call YesNo API');
    it('should return YesNo response in JSON format');
});
Using spies and stubs
Yet, contrary to what we defined as the best way to proceed before, we are going to implement the feature before tests:
export default () => fetch(`https://yesno.wtf/api/`)
    .then(response => response.json());
fetch is the modern successor of XmlHttpRequest or $.ajax. It allows making some network calls using promises. It is not well supported yet, and we would need a polyfill if we use it on oldest browsers or Node versions. However, we don’t really care about IE6 support in this proof of concept, do we?
As the code is self-explanatory, let’s focus on tests. We need to check which URL has been called by fetch. We can use some spies on it. A spy is an object tracking all function calls: how many times was it called? With which arguments? Jest provide an easy way to set up spies using jest.fn() function.
import ask from './Api';

describe('API Caller', () => {
    it('should call YesNo API', () => {
        const fetchSpy = jest.spyOn(global, 'fetch');

        return ask()
            .then(() => {
                expect(fetchSpy).toHaveBeenCalledWith('https://yesno.wtf/api/');
            });
    });
});
Let’s focus on these three lines. We start by defining a spy on the fetch method. Indeed, Jest can only mock object methods. Yet, we circumvent the issue using the global object. Then we call our API and check that our spy has been correctly called, using YesNo API URL.
Note we returned a promise in our test suite. This is done to ensure our test would wait until the end of the returned promise. Without this return, test would create a new parallel thread to launch our API call, yet the test would reach its end and simply finish. All tests in our then would not be executed, causing an always green test. Not really useful, is it?
If we launch the test with the code above, we would face a critical error:
TypeError: Network request failed
    at XMLHttpRequest.xhr.onerror (/home/jpetitcolas/dev/yesno/node_modules/whatwg-fetch/fetch.js:436:16)
Our test suite broke because we made a network request. This is a really bad practice. Calling external systems within our tests increase the time to execute (network is slow) and reduce their viability. What about if the third system is temporarily down? Our tests should be resilient to other system failures. At least, for the unit ones. So, we need to prevent this network request. Fortunately, Jest provides a mockImplementation method:
it('should call YesNo API', () => {
    const fetchSpy = jest.spyOn(global, 'fetch')
        .mockImplementation(() => ({}));

    return ask()
        .then(() => {
            expect(fetchSpy).toHaveBeenCalledWith('https://yesno.wtf/api/');
        });
});
We replaced the default behavior of fetch (making a network call) to a simple function, returning an empty object. Launching our tests again would give us the following output:
  ● API Caller › should call YesNo API

    TypeError: fetch(...).then is not a function
Indeed, our code expects a promise as a return value of fetch. Not an issue: just return a Promise resolving a fake response object:
it('should call YesNo API', () => {
    const fetchSpy = jest.spyOn(global, 'fetch')
        .mockImplementation(() => Promise.resolve({
            json: () => {},
        }));

    return ask()
        .then(() => {
            expect(fetchSpy).toHaveBeenCalledWith('https://yesno.wtf/api/');
        });
});
Our test should pass. Let’s verify is it really testing our code by making it fail, for instance by changing URL in Api.js. Remember: a test which has never failed is not a reliable test.
It’s time now to implement our second test:
it('should return YesNo response in JSON format', () => {
    const fetchSpy = jest.spyOn(global, 'fetch')
        .mockImplementation(() => Promise.resolve({
            json: () => ({ foo: 'bar' }),
        }));

    return ask()
        .then(response => {
            expect(response).toEqual({ foo: 'bar' });
        });
});
It looks good. We updated the returned structure of our json method and tested that we correctly receive this structure at the end of our API call.
Yet, if we debug our test adding the following line:
it('should return YesNo response in JSON format', () => {
    const fetchSpy = jest.spyOn(global, 'fetch')
        .mockImplementation(() => Promise.resolve({
            json: () => ({ foo: 'bar' }),
        }));

    console.log(fetchSpy.mock.calls); // <----

    return ask()
        .then(response => {
            expect(response).toEqual({ foo: 'bar' });
        });
});
We can notice something weird. Before the ask call, we already have a call to our API:
  console.log src/Api.test.js:21
    [ [ 'https://yesno.wtf/api/' ] ]
Indeed, we didn’t reset our fetch mock between all tests. To do so, just add an afterEach function (which will be called at the end of each of our tests):
describe('API Caller', () => {
    afterEach(() => {
        jest.resetAllMocks();
    });
});
Our console.log should not display any calls anymore.
If we didn’t use create-react-app, we may have configured this behavior globally, telling Jest to reset mocks automatically between each test. We can achieve that editing our package.json file and adding the following configuration:
{
    "jest": {
        "resetMocks": true
    }
}
Yet, it is currently not supported by create-react-app (see this issue). So, we have to think about the resetAllMocks method in all our tests for now.
Using mock Function
The only missing step for our application is to plug our <App /> component to our Api function. So, let’s update our test to represent a more realistic user behavior:
it('should display Internet Gods answer in both text and picture format', () => {
    const wrapper = shallow(<App />);
    wrapper.find('button').simulate('click');

    wrapper.update();

    const answer = wrapper.find('.answer');
    expect(answer.find('h1').text()).toBe('no');
    expect(answer.find('img').prop('src')).toBe('https://yesno.wtf/assets/no/0-b6d3e555af2c09094def76cf2fbddf46.gif');
});
Note the call to wrapper.update(). This is required as we updated state.
We replaced the setState call by a click on the submit button. We now need to update our <App /> component to send a real API call:
import askApi from './Api';

class App extends Component {
    constructor(props) {
        super(props);
        this.state = { answer: null };
    }

    ask = () => askApi().then(answer => this.setState({ answer }));

    render() {
        return (
            <div className="App">
                <div className="question">
                    <input type="text" />
                    <button type="submit" onClick={this.ask}>Ask to the Gods of the Internet!</button>
                </div>

                {this.state.answer && (
                    <div className="answer">
                        <h1>{this.state.answer.answer}</h1>
                        <img src={this.state.answer.image} alt={this.state.answer.answer} />
                    </div>
                )}
            </div>
        );
    }
}
We added an onClick prop on our button. It calls a method declared differently of our render method. It is declared as a class variable (ask = () => {}). It allows to prevent some this binding issues and is possible thanks to the Babel Transform Class Properties plug-in, already configured by create-react-app.
Launching our test would raise an already familiar error:
TypeError: Network request failed
    at XMLHttpRequest.xhr.onerror (/home/jpetitcolas/dev/yesno/node_modules/whatwg-fetch/fetch.js:436:16)
Indeed: our application still calls the real API as we didn’t mock Api module in App tests. In this case, we are going to use jest.mock function. This powerful function allows mocking a module directly in the Node requirements resolution process.
jest.mock('./Api');This line changes the ./Api file resolution to __mocks__/Api.js file. Hence, if we create such a file adding the following code:
// __mocks__/Api.js
export default () => Promise.resolve({
    answer: 'no',
    forced: false,
    image: 'https://yesno.wtf/assets/no/0-b6d3e555af2c09094def76cf2fbddf46.gif'
});
All calls to our Api.js file would resolve a promise with an example of successful response. With this single reusable line of code, our <App /> component is mocked.
Note we can put this line wherever we want in the file. It uses code hoisting. Behind this obscure expression is a very simple concept: all code “hoisted” would appear at the very beginning of the file. It prevents some require resolution conflicts.
Launching our tests again gives us another error:
  ● should display Internet Gods answer in both text and picture format

    Method “text” is only meant to be run on a single node. 0 found instead.
It doesn’t find the .answer h1 title. Indeed: our API call is done via a Promise and is asynchronous. We need to wait the Promise to be resolved. Even if we return an already resolved promise, JavaScript waits for the next JS event loop tick before effectively resolving promises. Hence, we need to wait before testing our .answer. We can either use a setTimeout call, or better, another Promise.resolve call in our test:
it('should display Internet Gods answer in both text and picture format', () => {
    const wrapper = shallow(<App />);
    wrapper.find('button').simulate('click');

    return Promise.resolve()
        .then(() => {
            wrapper.update();

            const answer = wrapper.find('.answer');
            expect(answer.find('h1').text()).toBe('no');
            expect(answer.find('img').prop('src')).toBe('https://yesno.wtf/assets/no/0-b6d3e555af2c09094def76cf2fbddf46.gif');
        });
});
Finally, if we give a last look on our test suite, everything should be green. Our app is ready to be shipped!
 PASS  src/App.test.js
  ✓ should display a text input to fill question (5ms)
  ✓ should display a submit button to send question to the Internet Gods (4ms)
  ✓ should not display any answer by default (2ms)
  ✓ should display Internet Gods answer in both text and picture format (7ms)

Test Suites: 1 passed, 1 total
Tests:       4 passed, 4 total
Snapshots:   0 total
Time:        0.232s, estimated 1s
And here is the final interactive version. Press the button to update the answer:
We may improve rendering by setting a loader or by hiding already displayed picture when re-submitting the form. Yet, it goes beyond the scope of this post. So, we’ll settle for this not perfect but working app.
Some Jest Extra Tips
Snapshot Testing
Another interesting feature of Jest is the Snapshot Testing. When we test a huge or unknown input, instead of console-logging the output and inserting it into a .toEqual() method, we can use the .toMatchSnapshot() function. For instance, if we want to test the total output of our <App /> render function, we can use something like:
it('should render <App /> correctly', () => {
    const wrapper = shallow(<App />);
    expect(wrapper).toMatchSnapshot();
});
First time this test would be executed, it would record the value of wrapper and store it in a file saved in __snapshots__ folder. Then, if we run the test again, it will then compare the new test value with the stored one. If they are different, an error will occur, asking us if we want to update the snapshot file.
This feature is interesting but should not be used compulsively. If our use case is simple and we know exactly what we expect, it is far better to use toEqual. Indeed, reading the diff between expected and current output would be easier.
I see two use cases where snapshot testing is useful:
- When joining an existing project with no tests: it allows to setup quickly a basic test coverage which will be refined over time,
- When writing some integration tests: we just want to ensure everything works but don’t care about implementation details.
Hence, we must be careful with this tool: with great feature comes great responsability!
Interactive Filters on Jest Interface
Another Jest killer feature is its interface. In addition to its great colors and output, we can filter interactively tests we want to run:
 › Press o to only run tests related to changed files.
 › Press p to filter by a filename regex pattern.
 › Press t to filter by a test name regex pattern.
 › Press q to quit watch mode.
 › Press Enter to trigger a test run.
Filtering tests without setting up some .only is great! Of course, with some code reviews, with some Git hooks and with some rigor, we never skip by mistake any tests before a production deployment. Or, do we?

Conclusion
In conclusion, we are far from our past experience with Jest. No configuration, a very simple mock system, an interface designed for developers (for once, it’s a compliment!), good performances… I strongly encourage you testing it! And, last but not least: Jest is not restricted to the React ecosystem. For example, we use it on EventDrops, a data visualization project based on D3.js.
All source code of this application is available on GitHub. Take a look on commits history, each one is a step of this tutorial.