Sandboxing YOLO Claude Code Agents on a VPS

I’ve been using Claude Code for a long time now, and one papercut quietly compounds across the day: approving permissions. Every curl, every bash command, every time Playwright wants to debug my front-end, I need to approve it explicitly. Across dozens of agent runs in a working session, it kills the flow and slows me down.
The proper fix we’re building at Tint involves a whole EKS cluster running behind Qovery (companion post coming shortly). Replicating that setup for personal projects is not just overkill, it’s expensive: more than $200/mo for an AWS cluster. I wanted a cheap, disposable box where Claude Code could run with --dangerously-skip-permissions (what I’m calling the YOLO mode) without putting my laptop or home network at risk.
One thing I underestimated before building this: since the box lives in the cloud and not on my laptop, I can drive Claude from anywhere. I’ve kicked off /implement runs from my bed before getting up, from the bus on the way to a meeting, or while waiting in line at the bakery. Every crazy idea gets a prototype on the spot instead of waiting until I’m back at my desk. The productivity bump turned out to be the most addictive part of the setup.
This post walks through the box I landed on: a Hetzner VPS at around $10/mo, where the agent can only reach a short whitelist of domains (Anthropic, GitHub, npm, and a few others).
The Threat Model
A YOLO agent is, by design, untrusted code with internet access. The sandbox isn’t trying to stop a determined attacker who controls the agent’s prompts. Anyone in that position can already exfiltrate through any allowed channel: push a public Gist to github.com and the secret is out. What I want from the sandbox is more modest:
- File isolation. If the agent goes wild, the damage is confined to the VPS filesystem, never my laptop.
- Network isolation. The agent can only reach a short whitelist of domains. Connections to random IPs or ports are blocked at the kernel level.
- Out of my personal realm. The box lives in a remote datacenter, not on my home LAN. My router, NAS, and the rest of my devices stay invisible to the agent.
Everything happens on a fully isolated VPS I can nuke and rebuild in minutes. Agents are cattle, not pets.
Architecture Diagram
Tailscale is the only door in. The Hetzner firewall drops everything else from the public internet. In the other direction, anything the agent tries to send out has to clear both iptables and squid before it reaches a whitelisted host.
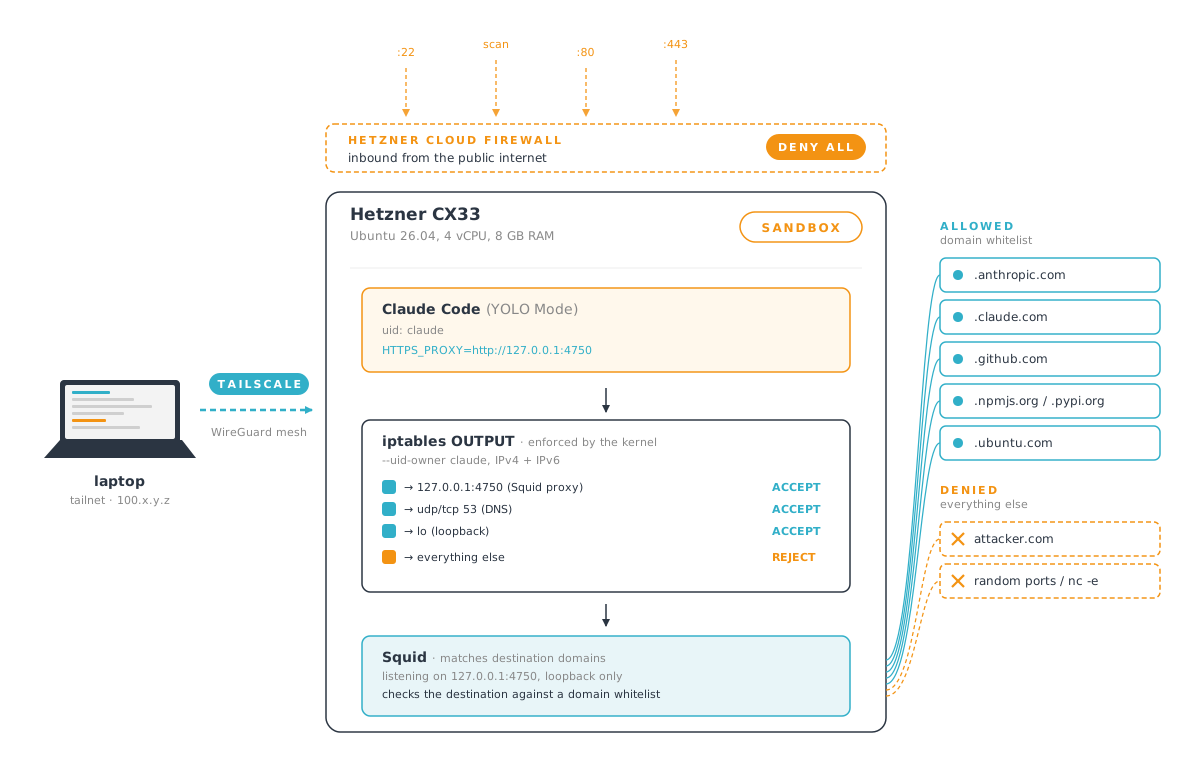
The sandbox relies on two different stacked filters:
- Squid. Anything that respects
HTTPS_PROXY(curl, npm, pip, git, Node’sfetch, the Anthropic SDK) goes through it. Squid matches the destination hostname against an allowlist. - iptables. This is where the security is actually enforced: the kernel blocks the agent from reaching anything outside Squid and DNS, even if it ignores
HTTPS_PROXY.
iptables can only filter by IP and port, so it allows outbound traffic only to squid on 127.0.0.1:4750 and to DNS. Anything respecting the HTTPS_PROXY env var ends up at squid, which reads the HTTP request, checks the destination hostname against the whitelist, and either tunnels or refuses.
For instance, let’s consider curl https://api.anthropic.com/v1/messages:
curlreadsHTTPS_PROXY.- It sends
CONNECT api.anthropic.com:443tosquidon127.0.0.1:4750. iptablesallows the connection because it’s to localhost.squidmatches.anthropic.comagainst the whitelist.- It tunnels the connection out to Anthropic. SUCCESS!
Now consider curl --noproxy '*' https://1.2.3.4/:
curlskips the proxy and tries to open a direct TCP connection to1.2.3.4.iptablessees outbound traffic to a non-localhost IP.- The kernel refuses the TCP handshake. BLOCKED!
Stacked together, iptables and squid close the obvious exfiltration paths. It’s not airtight: a determined script could still push secrets to a public GitHub repo since github.com is on the whitelist. But the risk is much lower than running the agent unsandboxed.
The Box
I looked at a few other providers first, but Hetzner came out the cheapest. I went with their CX33, which gives me 4 vCPU and 8 GB of RAM for $7.99/mo. The IPv4 address costs another $0.60. IPv6 is free, but plenty of the internet still has no AAAA record, so I took the cautious path and added IPv4 too.
I usually run several Claude Code agents in parallel, each spawning sub-agents of its own. It’s a trade-off: am I ready to pay more to run faster? For my side projects, budget was the limiter, and I found the CX33 to be the right compromise.
Note: I’m not affiliated with Hetzner in any way. This is just honest developer feedback.
Securing my VPS for YOLO Clauding
The whole setup runs over SSH from my laptop. Below, I’ll walk through how I secured the VPS, step by step.
SSH Key and VM Creation
First, I generated a new dedicated SSH key, separate from my default identity. This way, if the key ever leaks, the blast radius stays small.
ssh-keygen -t ed25519 -C "hetzner-ai-agents" -f ~/.ssh/hetzner-ai-agentsThen I headed over to the Hetzner Console, clicked Create Server, and picked:
- Type: Cost-Optimized → CX33
- Image: Ubuntu 26.04
- SSH Key: the contents of the
.pubfile I’d just generated - Name:
ai-agents
I left everything else (Volumes, Firewalls, Backups, Placement, Labels, Cloud Config) at the defaults.
Updating the System
Now that the VPS is up, it’s time to update the system and make sure incoming security patches are applied automatically.
# Log in as root and apply pending updates
ssh -i ~/.ssh/hetzner-ai-agents root@<ip>
apt update && apt upgrade -y

# Enable automatic security patches
apt install -y unattended-upgrades
systemctl enable --now unattended-upgrades
unattended-upgrades keeps the security archive in sync on its own, so I don’t have to remember to log in and run apt upgrade every few days.
Securing SSH Access
Next, I closed the SSH door for everyone but me. That meant creating a sudo-capable claude user, copying my SSH key over, and disabling root SSH and password auth altogether.
adduser claude
usermod -aG sudo claude
mkdir -p /home/claude/.ssh
cp /root/.ssh/authorized_keys /home/claude/.ssh/
chown -R claude:claude /home/claude/.ssh
chmod 700 /home/claude/.ssh && chmod 600 /home/claude/.ssh/authorized_keys
Next, I disabled every other login method: passwords, keyboard-interactive prompts, and root SSH. I dropped this into /etc/ssh/sshd_config.d/99-hardening.conf:
PermitRootLogin no
PasswordAuthentication no
PubkeyAuthentication yes
KbdInteractiveAuthentication no
A sudo systemctl reload ssh later, only my key is able to get in.
The dedicated claude user isn’t just for server hygiene. It serves a real security purpose: every iptables rule below is scoped with --uid-owner claude, so root keeps full network access for system administration. That way, apt upgrade, package installs, and kernel patches all still work.
Setting up a Private Network with Tailscale
For better security, SSH shouldn’t be reachable from the public internet at all. Tailscale gives me a WireGuard mesh between my laptop and the VPS. A WireGuard mesh is an encrypted network where the machines reach each other directly, with no central server in between. No inbound port stays open on either side.
I installed Tailscale (on the VPS) with the following:
curl -fsSL https://tailscale.com/install.sh | sh
sudo tailscale up --ssh
It returned me a Tailscale login URL. Once authenticated, my box joined the tailnet automatically. Super simple! Running tailscale ip -4 confirmed the connection and returned a 100.x.y.z address.
My laptop runs CachyOS, so I installed Tailscale on it with:
pacman -S tailscale
tailscale up
Closing the Public Door
With the tunnel up, the last step was to make my server invisible from the internet. Back in the Hetzner Console under Firewalls, I created one with empty inbound rules (deleting the default SSH rule), left outbound at allow-all, and attached it to the VM. As a result, the firewall has no rules left.
From anywhere on the public internet, the box is now a black hole. Port scans return nothing. The only way in is to connect over Tailscale:
ssh claude@<public-ip>   # hangs / times out
ssh claude@agent-box     # works (MagicDNS over the tailnet)
Filtering egress: the Smokescreen attempt
My first attempt at the egress allowlist used Stripe’s Smokescreen, built specifically to “let untrusted code make outbound HTTPS but only to allowed hosts.” On paper, the perfect tool.
After implementing it, every request came back 407: Client role cannot be determined. Reading the README more carefully, I figured out what was happening. Smokescreen authenticates each client using mutual TLS (mTLS): the client presents its own certificate, and Smokescreen reads the certificate’s Common Name (CN) to figure out the client’s “role”. That role is what gets matched against the allowlist.
My setup has no client certificate, so no role can be determined, and no policy applies (not even the default block in the ACL). The README confirms there’s no shortcut: “to use anything other than mTLS, fork the project and override Config.RoleFromRequest in Go code.”
Maintaining a Go fork for a single-user box would be far too much work. Time to fall back to a good old, boring tool: squid.
Squid as the Allowlist
Squid is a long-standing open-source HTTP proxy server, around since the mid-90s. It can match outbound requests against a domain allowlist out of the box, which is exactly what I needed.
Installing it on Ubuntu was straightforward:
sudo apt install -y squidI then replaced the default /etc/squid/squid.conf with my own:
# Bind to loopback only. Even if the iptables layer breaks,
# no external traffic can ever reach Squid.
http_port 127.0.0.1:4750

# dstdomain matches against the HTTP Host header (or the CONNECT target),
# so filtering happens at the hostname level, before any TCP socket opens.
acl allowed_domains dstdomain "/etc/squid/allowed_domains.txt"
acl SSL_ports port 443
acl Safe_ports port 80 443
acl CONNECT method CONNECT

# Tunneling and HTTP traffic are only allowed to whitelisted domains
# on safe ports (80, 443). Everything else is denied.
http_access deny CONNECT !SSL_ports
http_access deny !Safe_ports
http_access allow CONNECT SSL_ports allowed_domains
http_access allow allowed_domains
http_access deny all

# No caching: agents pull volatile artifacts, and a stale cache
# would mask real failures.
cache deny all
access_log /var/log/squid/access.log squid
cache_log  /var/log/squid/cache.log

# Don't leak that traffic went through a proxy or expose internal IPs.
visible_hostname agent-box
forwarded_for delete
via off
The last piece was the allowlist itself. I filled /etc/squid/allowed_domains.txt with the domains I wanted to whitelist:
# Anthropic
.anthropic.com
.claude.com

# GitHub
.github.com
.githubusercontent.com

# JS package registries
.npmjs.org
.npmjs.com
.yarnpkg.com

# Python package registries
.pypi.org
.pythonhosted.org

# Ubuntu apt
.ubuntu.com
The leading dot means “this domain and any subdomain”, so .anthropic.com covers api.anthropic.com, console.anthropic.com, and the rest of the family.
With both files in place, I validated the config and restarted Squid:
sudo squid -k parse                 # validate config
sudo systemctl restart squid
A quick smoke test before adding iptables confirmed my network filters:
curl -x http://127.0.0.1:4750 -sI https://api.anthropic.com/ | head -3   # 200/401
curl -x http://127.0.0.1:4750 -sI https://example.com/ | head -3         # 403 Forbidden
With Squid running, the last piece on the Squid side was telling every login shell to use it. I dropped this into /etc/profile.d/agent-proxy.sh:
export HTTPS_PROXY=http://127.0.0.1:4750
export HTTP_PROXY=http://127.0.0.1:4750
export NO_PROXY=127.0.0.1,localhost,::1
Most modern tooling respects these env vars: curl, npm, pip, git’s HTTPS transport, Node’s fetch, the Anthropic SDK. Most? Yes, and that’s exactly why I’ll need iptables on top.
To see what Squid is blocking in real time, I tail the access log. It’s the fastest way to spot a missing domain in the allowlist:
sudo tail -f /var/log/squid/access.log | grep DENIEDMaking the Proxy Mandatory with iptables
Squid does the work, but only for clients that politely set HTTPS_PROXY. An agent that ignores the env var would bypass it entirely. I needed a second layer that didn’t trust the first.
iptables is the right tool for that. It runs in the kernel, at the lowest layer the network stack exposes, so every outbound packet is evaluated before any process can do anything with it. No userspace program can bypass it.
I also installed iptables-persistent to keep the rules across reboots:
# Install the persistence tooling so rules survive reboots
sudo apt install -y iptables-persistent

# Allow outbound to Squid on 127.0.0.1:4750
sudo iptables -A OUTPUT -m owner --uid-owner claude -d 127.0.0.1 -p tcp --dport 4750 -j ACCEPT

# Allow outbound DNS (UDP and TCP)
sudo iptables -A OUTPUT -m owner --uid-owner claude -p udp --dport 53 -j ACCEPT
sudo iptables -A OUTPUT -m owner --uid-owner claude -p tcp --dport 53 -j ACCEPT

# Allow loopback (process-to-process on the same box)
sudo iptables -A OUTPUT -m owner --uid-owner claude -o lo -j ACCEPT

# Reject everything else
sudo iptables -A OUTPUT -m owner --uid-owner claude -j REJECT

# Persist the rules across reboots
sudo netfilter-persistent save
I also had to mirror every rule for IPv6. Without it, agents could bypass the sandbox on any dual-stack host, since curl and friends prefer AAAA records when both A and AAAA exist:
sudo ip6tables -A OUTPUT -m owner --uid-owner claude -d ::1 -p tcp --dport 4750 -j ACCEPT
sudo ip6tables -A OUTPUT -m owner --uid-owner claude -p udp --dport 53 -j ACCEPT
sudo ip6tables -A OUTPUT -m owner --uid-owner claude -p tcp --dport 53 -j ACCEPT
sudo ip6tables -A OUTPUT -m owner --uid-owner claude -o lo -j ACCEPT
sudo ip6tables -A OUTPUT -m owner --uid-owner claude -j REJECT

sudo netfilter-persistent save
With both layers in place, one final test confirmed the sandbox was holding:
curl -sI https://api.anthropic.com/ | head -3              # works
curl -sI https://example.com/ | head -3                    # 403
curl --noproxy '*' -sI https://api.anthropic.com/ 2>&1 | head -3   # connection refused
All three behaved as expected, confirming both iptables and squid were doing their job.
Installing our agentic tooling
I installed everything as root (no iptables restrictions for root):
# Install Node.js, npm, git, and the GitHub CLI
sudo apt install -y nodejs npm git gh

# Install Claude Code globally via npm
sudo npm install -g @anthropic-ai/claude-code

# Configure git
git config --global user.name "Jonathan Petitcolas"
git config --global user.email "petitcolas.jonathan@gmail.com"

# Rewrite git@github.com: SSH URLs to HTTPS (port 22 is blocked by iptables)
git config --global url."https://github.com/".insteadOf "git@github.com:"

# Authenticate with GitHub (stores the token in the system credential helper)
gh auth login
The insteadOf line matters. The sandbox blocks port 22 entirely, so any attempt to clone with git@github.com:... would hit iptables REJECT. The rewrite turns those into HTTPS clones instead, which go through Squid and are allowed.
Finally, I added a shell alias so every claude invocation runs in YOLO mode by default:
echo 'alias claude="claude --dangerously-skip-permissions"' >> ~/.bashrcThat’s only safe because of the sandbox. Without iptables blocking outbound traffic, I’d never run Claude with --dangerously-skip-permissions on a regular machine, given the data exfiltration risks involved.
Accessing Dev Servers from the Laptop
Most of my projects involve running a development server, and I need to view the result in my laptop browser. tailscale serve does exactly that: it exposes a local port on the VPS to the tailnet over HTTPS, with no Hetzner firewall change needed.
By default, tailscale serve needs root. I granted my user permission once with the following command:
sudo tailscale set --operator=$USERAfter that, I can expose any local port as the claude user with a single command:
tailscale serve 3000 # proxies localhost:3000 over the tailnetFrom any device on my tailnet (laptop, phone), I opened https://<machine-name>.<tailnet-id>.ts.net/ in the browser. Tailscale handled HTTPS termination and forwarded everything to the local port. The URL only resolves inside the tailnet, so there’s no public exposure. When I was done, tailscale serve off 3000 shut the proxy down.
Clauding on the Road
A side effect of the box being remote: any device with an SSH client and Tailscale becomes a Claude Code terminal. I can test any idea even when I’m far from my laptop. The agent does all the work on the VPS, and my phone just attaches to the running tmux session.
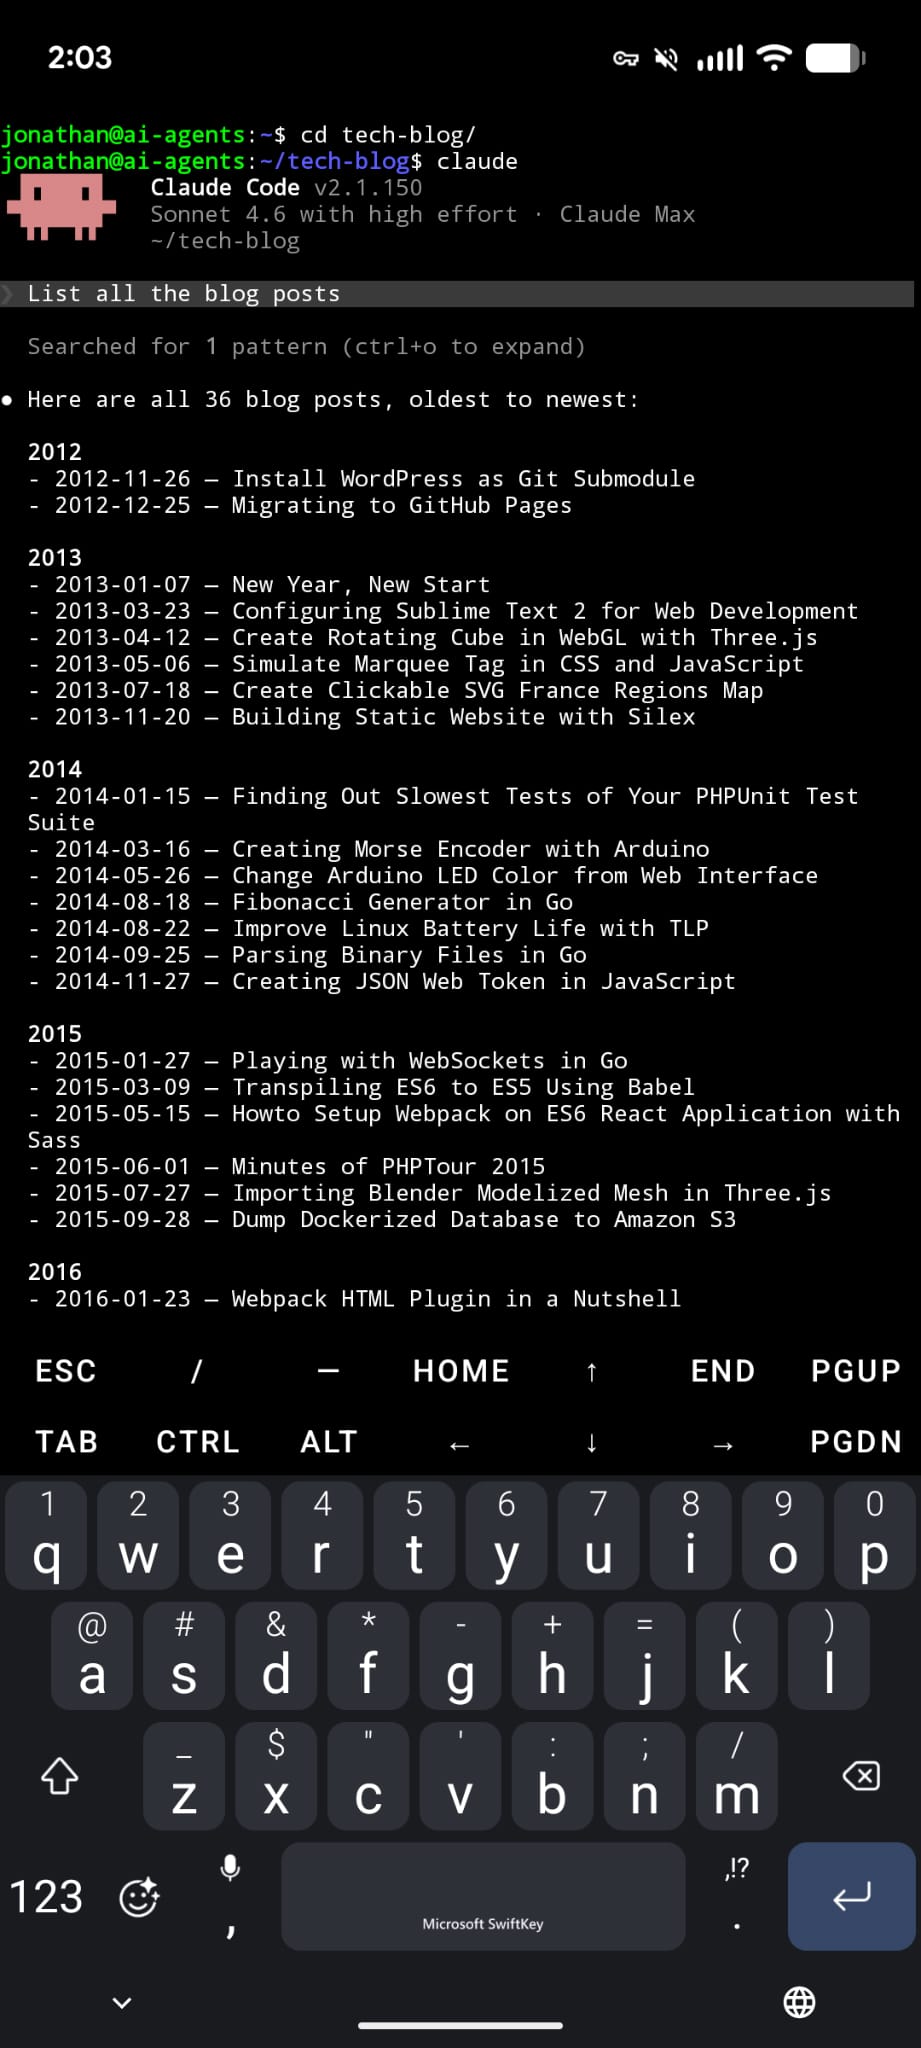
On Android I use Termux. On iOS, Blink Shell does the same job.
What the Sandbox Doesn’t Stop
The sandbox closes the obvious attack paths, but a few gaps remain open. I’m aware of them, and I’ve decided each one is an acceptable trade-off for a personal YOLO box.
- Filesystem access. The agent has full read/write inside
/home/claude. I keep secrets out of that directory unless the work actually needs them. - Exfiltration through allowed hosts. Anything the GitHub token can write to is still reachable, and so is
api.anthropic.com. I scope the token tightly to specific repos to limit the blast radius. - DNS exfiltration. DNS lookups stay open on port 53. A clever script could smuggle data inside the queries it makes (looking up
<encoded-secret>.attacker.com, where the attacker controls the DNS forattacker.com). The fix would be to force DNS through a resolver I control and watch for suspicious patterns. I haven’t bothered: for a personal box, the risk is low. - Supply-chain attacks.
npm installandpip installrun arbitrary code asclaude. I keep them in mypermissions.asksettings so the agent has to get explicit approval before installing anything.
With this sandbox in place, I unleash Claude in YOLO mode without thinking twice. The productivity gain has been incredible, my experiments are flying, and I can oversee everything straight from my phone. I’m genuinely thrilled with how much this has changed the way I build.