Changing Arduino RGBL color through a web interface
After the first tutorial about a morse encoder with Arduino, I decided to go further: using a web interface to drive my board. To achieve this purpose, I used the Johnny Five framework (allowing to program on Arduino with Javascript) and Socket.io for communication between the browser and the circuit.
Here is a demonstration video of the expected result:
If you just want to grab the source code, here is the GitHub link.
Wiring our RGB LED
First step is of course to create our circuit. We will need a RGB LED and three 330Ω resistors. The RGB LED (RGBL) is easily recognizable with its four pins. Longest should be linked to the ground. If you put the longest pin at second position, red will be the first, green and blue the third and fourth respectively. Do not forget to add some resistors to avoid to burn out them:

A RGB LED is simply the association of three LEDs of three different colors (red, blue and green). Gathering them allows you to produce a wide range of colorful lights.
And here is the textual description of the breadboard:
- RGBL: four pins on A1, A2 (longest pin), A3 and A4
- Resistors: E1/F1, E3/F3, E4/F4
- Ground: C2
- Arduino pin 9~: J1 (red pin)
- Arduino pin 10~: J3 (green pin)
- Arduino pin 11~: J4 (blue pin)
We are using here some analogic-like Arduino outputs (symbolized by a tilde ~ near the pin number) as we need some values from 0 to 255. Indeed, with only a binary field, we would only be able to switch on or off each LED, without adjusting their respective intensity. Yet, the Arduino is only capable to output binary signal. That’s why this is not pure analogic signal but simulated one. This is done through a physical trick called pulse width modulation (PWM).
Understanding the pulse width modulation (PWM)
Pulse Width Modulation (PWM) is a physical trick to simulate an analogic signal from a binary one. It plays with the average voltage of a square wave: if the frequency of this signal is high, we can assimilate the output voltage to the average value of high and low level, ponderated by their respective duration.
For instance, let’s imagine the following signal, where the period T is very short:

The average output would simply be (t/T) * Vmax. This way, it is possible to emulate an output of a wide range of values, from 0V (t = 0, a null signal) to 5V (t = T, a full +Vmax signal), just switching the signal on and off with different timings.
So, now we got the really basic principle of PWM (for more detailed explanations, see Wikipedia), let’s go back to our IDE!
Introducing Johnny Five, the Arduino Javascript framework
Johnny Five is a Javascript Arduino framework, allowing us to control our circuit using our favorite language. Far more developer friendly than Arduino native language, it will also provide us an easy way to interact with our prototype using websockets.
Bootstrapping Johnny Five
First, let’s bootstrap our new Node.js LED color picker application, creating a package.json file in our project folder:
{
    "dependencies": {
        "johnny-five": "latest"
    }
}
Then, retrieve it effectively using a npm install. Here is our first testing program:
var five = require('johnny-five');

var led;
var board = new five.Board();

board.on("ready", function() {
    led = new five.Led.RGB([9, 10, 11]);
    led.pulse();

    this.repl.inject({ led: led });
});
After embedding Johnny Five framework, we wait for our board ready event. It is the equivalent of DOM ready for our Arduino. Then, we instantiate a new RGB LED, plugged on pins 9, 10 and 11 (for red, green and blue respectively), and then we make our LED pulsing, ie fading between off and on states. As you can see, it is far more intuitive than pure Arduino language.
Finally, we inject to the interactive shell our LED object. This will allow to manipulate our LED directly through a prompt, with autocompletion and console. So useful for debugging! For instance:
>> led. # Pressing Tab
led.__defineGetter__      led.__defineSetter__      led.__lookupGetter__
led.__lookupSetter__      led.constructor           led.hasOwnProperty
led.isPrototypeOf         led.propertyIsEnumerable  led.toLocaleString
led.toString              led.valueOf

led.brightness            led.color                 led.fade
led.fadeIn                led.fadeOut               led.off
led.on                    led.pulse                 led.stop
led.strobe                led.toggle

led.blue                  led.board                 led.green
led.id                    led.io                    led.pins
led.red

>> led.off();
undefined
>> console.log(led.color)
[Function]
undefined
>> console.log(led.color())
{ red: 0, green: 0, blue: 0 }
undefined
To compile and upload your program, simply launch your script:
# Launching as root for access to /dev/ttyUSB0
sudo node main.js
If everything has been set up correctly, your LED should go blink smoothly.
Listening websockets from Arduino
Next step is to make our Arduino listening websockets. This way, we would be able to manipulate it from everywhere, including a web browser. No surprise here, we are going to use Socket.io. So, add it to your package.json file:
{
    "dependencies": {
        // ...
        "socket.io": "latest"
    }
}
And re-run npm install. Then, let’s dive into the simplicity of this reference library. Edit your main.js file:
var io   = require('socket.io').listen(8080);

board.on("ready", function() {
    led = new five.Led.RGB([9, 10, 11]);
    led.on(); // No more pulse here

    io.sockets.on("connection", function(socket) {
        console.log("New connection: " + socket.id);
        socket.on("changeColor", function(e) {
            console.log("Changing color: " + e.color);
            led.color(e.color)
        });
    });

    this.repl.inject({ led: led });
});
First line we include Socket.io and tell it to listen to port 8080. Then in our code, we simply log new connections and wait for a changeColor event, which will be triggered by our web browser.
Testing it requires a Socket.io emitter. Let’s create a basic index.html page. Here is the minimal snippet to test our websocket:
<label>Color: <input type="text" id="color" name="color" placeholder="#ff0000" /></label>
<button id="changeColor">Change color!</button>

<!-- Do not forget to eventually change your Socket.io server settings -->
<script src="http://localhost:8080/socket.io/socket.io.js"></script>
<script>
    var socket = io.connect('//:8080');
    document.getElementById("changeColor").addEventListener("click", function() {
        var color = document.getElementById("color").value;
        socket.emit("changeColor", color);
    })
</script>
An input to enter the wished color, a button to validate, and a socket to emit the event when the user click on the button. Do not forget to make the listening and emitting ports match.
For Socket.io to work, you need to launch a web server on desired port. You are free to use the solution you want: Harp, Python SimpleHTTPServer, or whatever. As a PHP developer, I personnaly use:
php -S 0.0.0.0:8081Notice the web server port is not the same as the Socket.io server port.
Connect to your very basic Web interface, and try to change the color of your LED. The change should be directly repercuted on your Arduino. Isn’t it beautiful?
The end of this article is some bonus. It explains how to create a more advanced interface creating a hue picker.
Bonus: creating a hue picker
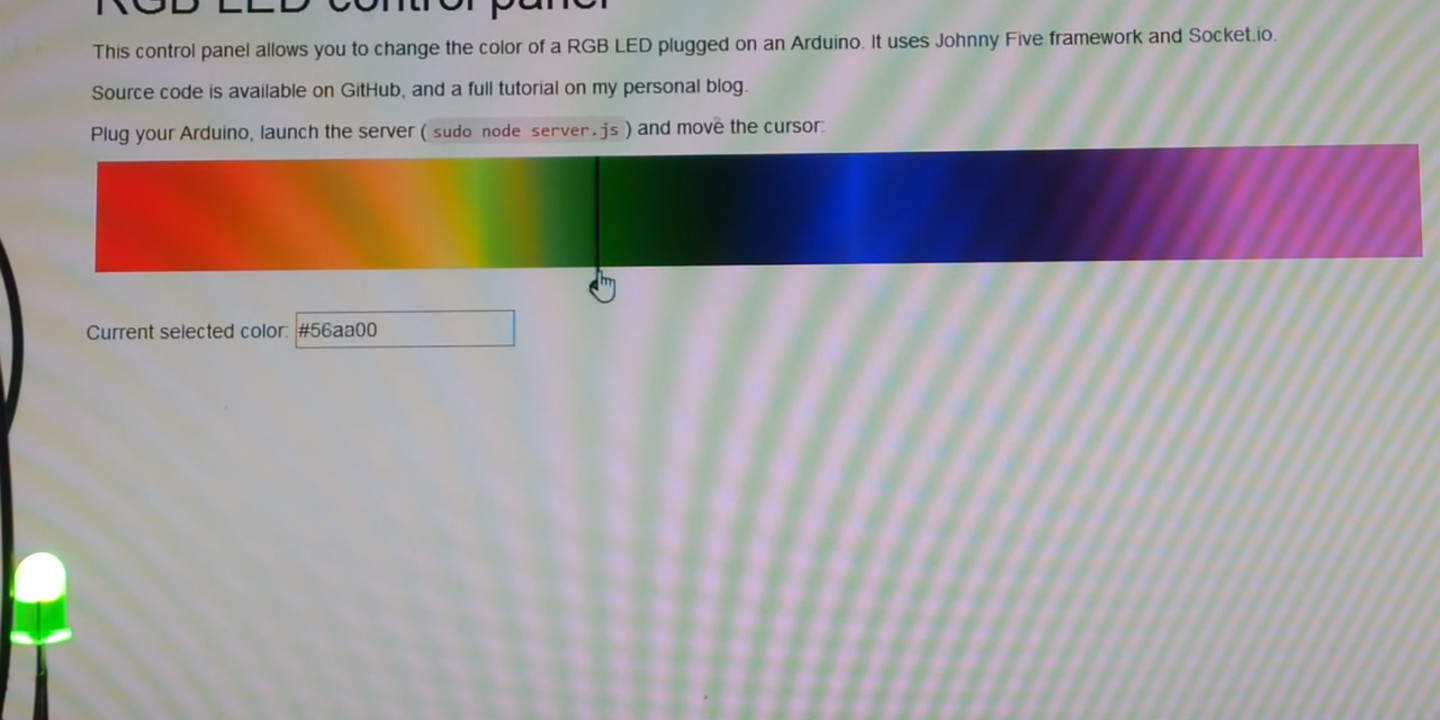
The objective of this part is to create a hue picker, allowing our users to select a color on a rainbow ribbon like the following:
")
The user would be able to drag and drop the marker across all the ribbon. The color will change at each new position.
First step to get quickly a rocking interface: let’s install Bootstrap. We also embed JQueryUI as we will need it later.
bower install --save bootstrap jqueryuiFor more reusability and flexibility, we encapsulate the code of our hue picker into a dedicated class.
var HuePicker = function(container, options) {
    this.container = container;

    this.width = options.width;
    this.height = options.height;

    this.marker = null;
    this.markerRadius = options.markerRadius || 5;
    this.markerX = 0;

    this.init();
};
I won’t explain it further, as variables are self-explained. Our init function will create a canvas containing our rainbow colors and create the marker:
/**
 * Initialize HuePicker widget and bind its events.
 */
HuePicker.prototype.init = function() {
    this._createCanvas();
    this.marker = this._createMarker();
};

/**
 * Create a canvas element and fill it with rainbow colors.
 * @private
 */
HuePicker.prototype._createCanvas= function() {
    // Let enough space to display marker correctly
    var width = this.width - 2 * this.markerRadius;
    var canvas = $('<canvas width="' + width + '" height="' + this.height + '">');
    canvas.css("margin-left", this.markerRadius);

    this.container.append(canvas);

    this.context = canvas.get(0).getContext("2d");
    this.context.fillStyle = this._getRainbowGradient();
    this.context.fillRect(0, 0, this.width, this.height);
};

/**
 * Return a canvas gradient containing all rainbow colors.
 * @returns {CanvasGradient}
 * @private
 */
HuePicker.prototype._getRainbowGradient = function() {
    var rainbowColors = ['red', 'orange', 'yellow', 'green', 'blue', 'indigo', 'violet'];

    var gradient = this.context.createLinearGradient(0, 0, this.width, 0);
    for (var i = 0, c = rainbowColors.length ; i < c ; i++) {
        gradient.addColorStop(i/c, rainbowColors[i]);
    }

    return gradient;
}

/**
 * Create SVG marker and return it.
 * @returns {*|jQuery|HTMLElement}
 * @private
 */
HuePicker.prototype._createMarker = function() {
    var svg  = '<svg>';
        svg += '<g id="marker">';
        svg += '    <line x1="' + this.markerRadius + '" y1="0" x2="' + this.markerRadius + '" y2="' + (this.height + 3 * this.markerRadius) + '"></line>';
        svg += '    <circle fill="red" cx="' + this.markerRadius + '" cy="' + (this.height + 15) + '" r="' + this.markerRadius + '"></circle>';
        svg += '</g>';

    this.container.append(svg);

    return $('#marker', svg);
}
This snippet is quite long, yet it is just adding some element and styling them. The only tricky part is the creation of the gradient. However, to make it as simple as possible, we simply take the rainbow colors, and attribute a equal part of the final gradient for each.
If you refresh your page, you should see the same ribbon as previously shown in this post, except there is no possible interaction.
Let’s add it, using the draggable component of jQuery-UI. In our init function, add this event handler:
var self = this;
$("circle")
    .draggable({ cursor: 'pointer' })
    .bind('drag', function(e, ui) {
        self._moveMarker(ui.position.left);
    });
Just some configuration, using a pointer cursor and the _moveMarker callback, whose code is:
/**
 * Move marker to specified position and emit required events.
 * @param x
 * @private
 */
HuePicker.prototype._moveMarker = function(x) {
    if (x < 0 || x >= this.width - 2 * this.markerRadius) {
        return;
    }

    this.markerX = x;
    $("#marker").attr("transform", "translate(" + x + ")");
    $(this).trigger("changeColor", [this.getValue()]);
}
First, we ensure marker will not go outside allowed bounds. Then, we move the marker, using a SVG translation on the whole marker group (the circle and the line). Then, we trigger a changeColor event on the hue picker, not the websocket yet, as we do not have it in the HuePicker context.
Retrieving a pixel color from the canvas does not return the hexadecimal code of the color. Instead, it returns an array like [R, G, B, alpha]. We need a transformer to convert array to hexadecimal:
/**
 * Return currently selected color.
 * @returns {string}
 */
HuePicker.prototype.getValue = function() {
    var currentColor = this.context.getImageData(this.markerX, 0, 1, 1);

    return this._convertPixelArrayToHexadecimalCode(currentColor.data);
};

/**
 * Convert a pixel value ([255, 0, 0, 255]) into its RGB equivalent (#ff0000).
 * @param pixelValue
 * @returns {string}
 */
HuePicker.prototype._convertPixelArrayToHexadecimalCode = function(pixelValue) {
    var hexadecimalColor = "#";
    for (var i = 0 ; i < 3 ; i++) {
        var hexadecimalPart = pixelValue[i].toString(16);
        if (hexadecimalPart.length == 1) {
            hexadecimalPart = "0" + hexadecimalPart;
        }

        hexadecimalColor += hexadecimalPart;
    }

    return hexadecimalColor;
}
To convert a number to its hexadecimal equivalent, we use the toString method, with the base parameter.
Finally, simply use your color picker on your web interface:
var huePicker = new HuePicker($("#color-picker"), {
    width: 940,
    height: 80
});

$(huePicker).on("changeColor", function(e, color) {
    $("#marker circle").attr("fill", color);
    socket.emit("changeColor", { color: color });
});
Move your cursor, and let’s the magic of websockets happens!
Code source of this sample is available on GitHub.